概述
本文介绍使用keras内置的VGG16神经网络,训练猫狗数据集
平台:kaggle
数据集: 2000张猫狗图片,数据量较小
模型:
VGG16 模型的权重,是经过训练1000种图片的,包括常见的猫和狗
分类信息参见:
https://gitee.com/65242847/tensorflow2/blob/master/vgg16/imagenet_classes.txt
根据 微调fine-tuning 文章的 “数据集小,数据相似度高” 一节中,可知:“数据集较小,相似度较高” 时:
使用 自带的权重, 可能 不需要 重新训练模型。
只需要 调整输出层,解决实际问题即可
但在本例中,为达到 演示效果,使用以下方式:
使用 VGG16 的 卷积层 和 池化层,使用 自带的权重,自定义 全连接层 和 输出层,重新训练模型。
具体使用哪一种效果好,根据实际情况,需要测试每一种模型
准备
导包
import tensorflow as tf
import glob
import os.path

import matplotlib.pyplot as plt

tf.__version__
定义用到的常量
# 权重文件
vgg16_weight_path=r'../input/vgg16/vgg16_weights_tf_dim_ordering_tf_kernels_notop.h5'

# 定义图片的尺寸,使用vgg16预训练模型
img_resize=256

AUTOTUNE=tf.data.experimental.AUTOTUNE

name_label_map={"cat":0,"dog":1}
读取测试数据
获取测试数据集的路径
test_path=r"../input/cat-dog/test/*/*.jpg"
test_paths=glob.glob(test_path)
test_paths[:5],test_paths[-5:]
获取测试数据集的标签
test_labels=[]
for item in test_paths:
    filename=os.path.basename(item)
    labelname=filename[:filename.find(".")]
    label=name_label_map.get(labelname)
    test_labels.append(label)

test_labels[:5],test_labels[-5:],len(test_labels)
根据测试的图片路径、标签,生成dataset
test_ds=tf.data.Dataset.from_tensor_slices((test_paths,test_labels))
test_ds
定义处理测试图片的函数
def parse_test(test_path,test_label):
    img_data=tf.io.read_file(test_path)
    img_arr=tf.io.decode_jpeg(img_data,channels=3)
    img_arr=img_arr/255
    img_arr=tf.image.resize(img_arr,(img_resize,img_resize))
    return img_arr,test_label
执行上面的函数
test_ds2=test_ds.map(parse_test,num_parallel_calls=AUTOTUNE)
test_ds2
执行结果如下:
<ParallelMapDataset shapes: ((256, 256, 3), ()), types: (tf.float32, tf.int32)>
执行结果中:((256, 256, 3), ())该元祖的第一个元素是图片数据集形状,第二个元素是标签数据集形状
设置批次(关键)
test_ds2=test_ds2.batch(32)
test_ds2
执行结果如下:
<PrefetchDataset shapes: ((None, 256, 256, 3), (None,)), types: (tf.float32, tf.int32)>
图片数据集的形状改成(None, 256, 256, 3),第一维是图片数量
注意: 此函数不能执行多次,否则形状会再次改变
执行prefetch()
test_ds2=test_ds2.prefetch(AUTOTUNE)
test_ds2
注意
上面3个操作,可以写在一起:
test_ds2=test_ds.map(parse_test,num_parallel_calls=AUTOTUNE).batch(32).prefetch(AUTOTUNE)
test_ds2
读取训练数据
获取训练数据集的路径
train_path=r"../input/cat-dog/train/*/*.jpg"
train_paths=glob.glob(train_path)
train_paths[:5],train_paths[-5:]
查看数量
train_size=len(train_paths)
train_size
获取训练数据集的标签
train_labels=[]
for item in train_paths:
    filename=os.path.basename(item)
    labelname=filename[:filename.find(".")]
    label=name_label_map.get(labelname)
    train_labels.append(label)

train_labels[:5],train_labels[-5:],len(train_labels)
根据训练的图片路径、标签,生成dataset
train_ds=tf.data.Dataset.from_tensor_slices((train_paths,train_labels))
train_ds
定义处理训练图片的函数
def parse_train(path,label):
    img_data=tf.io.read_file(path)
    img_arr=tf.io.decode_jpeg(img_data,channels=3)
    img_arr=img_arr/255
    # 图片变成相同大小
    img_arr=tf.image.resize(img_arr,(img_resize,img_resize))
    return img_arr,label
执行上面的函数、打乱顺序、设置批次、执行prefetch()
train_ds2=train_ds.map(parse_train,num_parallel_calls=AUTOTUNE).shuffle(train_size).batch(32).prefetch(AUTOTUNE)
train_ds2
作为训练数据集,需要打乱顺序,测试数据集只为了测试效果,不需要打乱顺序
使用vgg16模型
加载vgg16模型
指定include_top=False,表示 不需要top层,
此时,加载的权重文件,必须带有 notop字样
此时,还可以重新设置 input_shape输入形状
covn_base=tf.keras.applications.VGG16(include_top=False,input_shape=(img_resize,img_resize,3),weights=vgg16_weight_path,pooling="avg")

covn_base.summary()
执行结果:
=================================================================
Total params: 14,714,688
Trainable params: 14,714,688
Non-trainable params: 0
训练参数一千多万
冻结vgg16的权重(关键)
由于vgg16已经加载权重,就表示是训练好的模型,要冻结权重。
否则在训练时,会修改此部分的权重,导致准确率不上升。
比喻:相当于速冻水饺,已经是半成品,只需要水煮即可,不需要改动饺子形状、饺子馅!
# 冻结卷积层的权重
covn_base.trainable=False
创建新模型(关键)
keras预训练模型是不能调用add()方法添加其他层的
解决方法:创建新模型,新模型添加vgg16预训练模型,然后新模型再添加其他的层
model=tf.keras.Sequential()
#for item in covn_base.layers[:-4]:
#    model.add(item)
model.add(covn_base)

# model.add(tf.keras.layers.GlobalAveragePooling2D())
model.add(tf.keras.layers.Dense(512,activation="relu"))
model.add(tf.keras.layers.Dense(1,activation="sigmoid"))
model.summary()
执行结果:
=================================================================
Total params: 14,977,857
Trainable params: 263,169
Non-trainable params: 14,714,688
总共参数一千多万,但可训练参数只有263,169
编译并训练
model.compile(optimizer=tf.keras.optimizers.Adam(lr=0.001),loss="binary_crossentropy",metrics=["acc"])

history=model.fit(train_ds2,epochs=15,validation_data=test_ds2)
执行结果: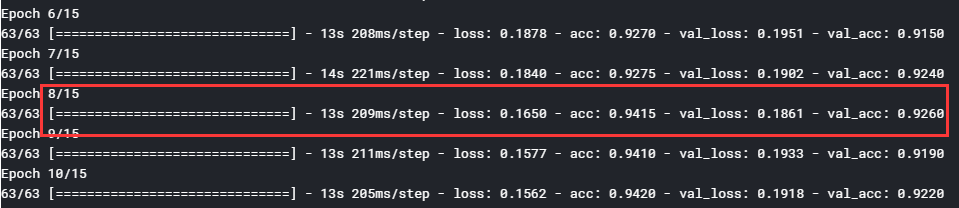
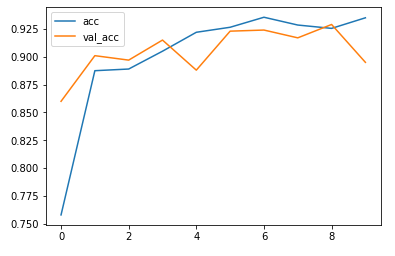
大约在执行 第8次时,开始过拟合
可视化
plt.plot(history.epoch,history.history["acc"],label="acc")
plt.plot(history.epoch,history.history["val_acc"],label="val_acc")
plt.legend()
plt.plot(history.epoch,history.history.get("loss"),label="loss")
plt.plot(history.epoch,history.history.get("val_loss"),label="val_loss")
# 必须加此代码,否则不显示图例
plt.legend()
plt.show()