概述
图像定位是计算机视觉又一大应用场景之一,比如在做人脸识别、安全帽识别时,要定位头部的位置: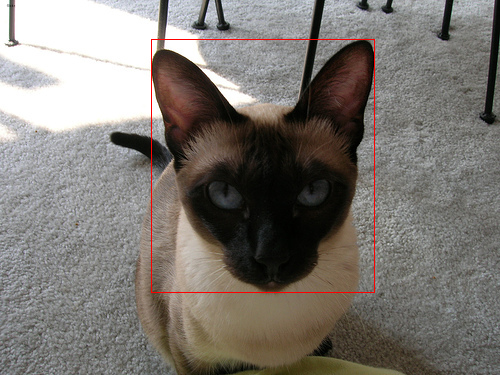
根据要求,用矩形框圈出图片中的某物体。
根据上图可知,需要输出4个数字,分别是4个点的x、y坐标,如下图:
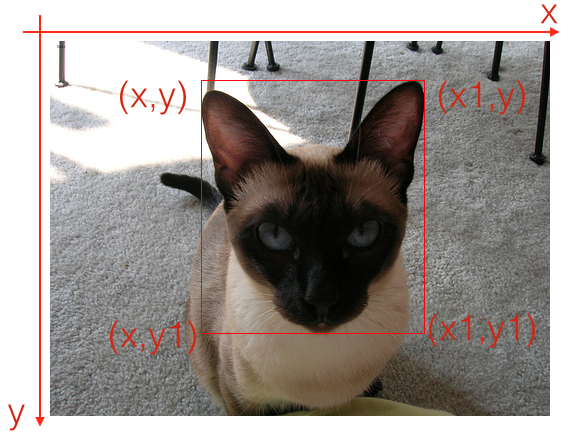
如果,左上角的坐标是(x,y),右下角的坐标是(x1,y1),右上角的坐标是(x1,y),那么左下角的坐标是(x,y1)
案例
数据集
数据集包含宠物图片,及与图片对应的xml,xml中包含图片分类、头部定位坐标等信息
xml
<annotation>
    <folder>OXIIIT</folder>
    <filename>Abyssinian_1.jpg</filename>
    <source>
        <database>OXFORD-IIIT Pet Dataset</database>
        <annotation>OXIIIT</annotation>
        <image>flickr</image>
    </source>
    <size>
        <width>600</width>
        <height>400</height>
        <depth>3</depth>
    </size>
    <segmented>0</segmented>
    <object>
        <name>cat</name>
        <pose>Frontal</pose>
        <truncated>0</truncated>
        <occluded>0</occluded>
        <bndbox>
            <xmin>333</xmin>
            <ymin>72</ymin>
            <xmax>425</xmax>
            <ymax>158</ymax>
        </bndbox>
        <difficult>0</difficult>
    </object>
</annotation>
网络架构
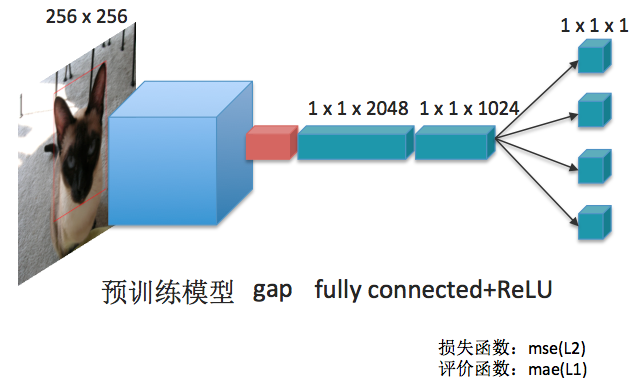
- 使用预训练模型
- gap
- 全连接层:一个2048,一个1024,激活函数都用ReLU
- 输出:x、y、x1、y1坐标
优点:
使用线性回归,简单
缺点:
在一张图片中只能定位一个动物的头部
代码
平台:kaggle.com
准备
本案例需要解析xml,使用lxml库
如果kaggle没有lxml,需要安装,执行下面命令:
!pip install lxml
在kaggle、notebook中,在前面输入!表示执行命令
导包
import glob
import tensorflow as tf
from lxml import etree

import matplotlib.patches as patches
import matplotlib.pyplot as plt
from PIL import Image,ImageDraw
import numpy as np

import IPython.display as display
定义常量
model_path='/kaggle/input/xception-weights-tf-dim-ordering-tf-kernels-notop/xception_weights_tf_dim_ordering_tf_kernels_notop.h5'

img_path='/kaggle/input/head-location/images/images/'

img_width=256

AUTOTUNE=tf.data.experimental.AUTOTUNE
获取所有xml路径
xmlpaths=glob.glob("/kaggle/input/head-location/annotations/annotations/xmls/*.xml")
len(xmlpaths)
解析xml
解析xml,并将 图片路径、边框坐标、分类、图片宽高放入到list中
# 图片路径
img_paths=[]
# 边框坐标
xmins=[]
ymins=[]
xmaxes=[]
ymaxes=[]
# 分类
type_infos=[]
# 图片宽高
w_h_infos=[]
for item in xmlpaths:
    html_el=etree.parse(item,etree.HTMLParser())
    filename=html_el.xpath("//filename/text()")[0]
    filetype=html_el.xpath("//name/text()")[0]
    xmin=html_el.xpath("//xmin/text()")[0]
    ymin=html_el.xpath("//ymin/text()")[0]
    xmax=html_el.xpath("//xmax/text()")[0]
    ymax=html_el.xpath("//ymax/text()")[0]
    width=html_el.xpath("//width/text()")[0]
    height=html_el.xpath("//height/text()")[0]
    img_paths.append(img_path+filename)
    img_type=0
    if filetype=="cat":
        img_type=0
    elif filetype=="dog":
        img_type=1
    else:
        print("未知类型:",filetype)
    xmins.append(int(xmin))
    ymins.append(int(ymin))
    xmaxes.append(int(xmax))
    ymaxes.append(int(ymax))
    type_infos.append(int(img_type))
    w_h_infos.append([int(width),int(height)])

len(xmins),len(img_paths),len(w_h_infos)
总数
count=len(img_paths)
count
测试图片、边框是否能正常显示
def test0(index):
    img=tf.io.read_file(img_paths[index])
    img=tf.io.decode_jpeg(img,channels=3)

    xmin=xmins[index]
    ymin=ymins[index]
    xmax=xmaxes[index]
    ymax=ymaxes[index]

    img=Image.fromarray(img.numpy())
    draw = ImageDraw.Draw(img)
    draw.line([(xmin, ymin),(xmax,ymin),(xmax,ymax),(xmin,ymax),(xmin, ymin)],width=1,fill='red')

    print("分类:",type_infos[index])
    print("宽高:",w_h_infos[index][0],w_h_infos[index][1])
    print("边框坐标:",xmin,ymin,xmax,ymax)
    display.display(img)

# test0(0)
test0(2)
测试统一图片宽高
由于图片宽高不同,在训练时需要指定的宽高,图片会变形,边框坐标也要按照比例调整,测试统一宽高后,图片、边框是否能正常显示
def test1(index):
    img=tf.io.read_file(img_paths[index])
    img=tf.io.decode_jpeg(img,channels=3)
    img=tf.image.resize(img,(img_width,img_width))

    w,h=w_h_infos[index]

    xmin=xmins[index]*img_width/w
    ymin=ymins[index]*img_width/h
    xmax=xmaxes[index]*img_width/w
    ymax=ymaxes[index]*img_width/h

#     调用resize()后,成小数
    img=img.numpy().astype("uint8")
    img=Image.fromarray(img)
    draw = ImageDraw.Draw(img)
    draw.line([(xmin, ymin),(xmax,ymin),(xmax,ymax),(xmin,ymax),(xmin, ymin)],width=1,fill='red')
    display.display(img)

    print("分类:",type_infos[index])
    print("宽高:",w_h_infos[index][0],w_h_infos[index][1])
    print("边框坐标:",xmin,ymin,xmax,ymax)
test1(2)
调整边框坐标
按照上面测试的算法,对边框坐标进行调整
# 边框坐标
xmins2=[]
ymins2=[]
xmaxes2=[]
ymaxes2=[]
for index in range(count):
    w,h=w_h_infos[index]

    xmin=xmins[index]*img_width/w
    ymin=ymins[index]*img_width/h
    xmax=xmaxes[index]*img_width/w
    ymax=ymaxes[index]*img_width/h

    xmins2.append(xmin)
    ymins2.append(ymin)
    xmaxes2.append(xmax)
    ymaxes2.append(ymax)
测试缩放后的边框坐标是否可用
def test2(index):
    img=tf.io.read_file(img_paths[index])
    img=tf.io.decode_jpeg(img,channels=3)
    img=tf.image.resize(img,(img_width,img_width))

    xmin=xmins2[index]
    ymin=ymins2[index]
    xmax=xmaxes2[index]
    ymax=ymaxes2[index]

    img=img.numpy().astype("uint8")
    img=Image.fromarray(img)
    draw = ImageDraw.Draw(img)
    draw.line([(xmin, ymin),(xmax,ymin),(xmax,ymax),(xmin,ymax),(xmin, ymin)],width=1,fill='red')
    display.display(img)

    print("分类:",type_infos[index])
    print("宽高:",w_h_infos[index][0],w_h_infos[index][1])
    print("边框坐标:",xmin,ymin,xmax,ymax)
test2(2)
test2(200)
创建dataset(注意)
注意: 将(xmins2,ymins2,xmaxes2,ymaxes2)作为label
ds=tf.data.Dataset.from_tensor_slices((img_paths,(xmins2,ymins2,xmaxes2,ymaxes2)))
处理图片
def process_image(path,label):
    img=tf.io.read_file(path)
    img=tf.io.decode_jpeg(img,channels=3)
    img=tf.image.resize(img,(img_width,img_width))
    img=img/255
    return img,label
ds2=ds.map(process_image,num_parallel_calls=AUTOTUNE)
测试
def test3(img,pos):
    xmin=pos[0]
    ymin=pos[1]
    xmax=pos[2]
    ymax=pos[3]

#     调用resize()后,成小数
    img=img.numpy()*255
#     print(img.dtype)
    img=img.astype("uint8")

    img=Image.fromarray(img)
    draw = ImageDraw.Draw(img)
    draw.line([(xmin, ymin),(xmax,ymin),(xmax,ymax),(xmin,ymax),(xmin, ymin)],width=1,fill='red')
    display.display(img)

    print("宽高:",w_h_infos[index][0],w_h_infos[index][1])
    print("边框坐标:",xmin,ymin,xmax,ymax)

for img,pos in ds2.take(3):
    test3(img,pos)
拆分训练数据集 和 测试 数据集
count_train=int(count*0.7)
ds2=ds2.shuffle(count)

ds_train=ds2.take(count_train).shuffle(count).batch(8).prefetch(AUTOTUNE)
ds_test=ds2.skip(count_train).batch(8).prefetch(AUTOTUNE)
创建Xception预训练模型
由于Xception的权重文件是在ImageNet中训练识别常见东西的,没有经过位置训练,所以让其可训练
xception=tf.keras.applications.Xception(include_top=False,weights=model_path,input_shape=(img_width,img_width,3))

xception.trainable=True

xception.summary()
创建模型
inp=tf.keras.Input(shape=(img_width,img_width,3))
hl=xception(inp)
hl.get_shape()
hl=tf.keras.layers.GlobalAveragePooling2D()(hl)
hl=tf.keras.layers.Dense(2048,activation="relu")(hl)
hl=tf.keras.layers.Dense(1024,activation="relu")(hl)

out0=tf.keras.layers.Dense(1,name="xmin")(hl)
out1=tf.keras.layers.Dense(1,name="ymin")(hl)
out2=tf.keras.layers.Dense(1,name="xmax")(hl)
out3=tf.keras.layers.Dense(1,name="ymax")(hl)

model=tf.keras.Model(inputs=[inp],outputs=[out0,out1,out2,out3])
model.summary()
编译训练
model.compile(optimizer=tf.keras.optimizers.Adam(learning_rate=0.0001),loss='mse',metrics=["mae"])

history=model.fit(ds_train,epochs=20,validation_data=ds_test)
可视化
查看损失值走势图
plt.plot(history.epoch,history.history["loss"],label="loss")
plt.plot(history.epoch,history.history["val_loss"],label="val_loss")
plt.legend()
优化
训练20次左右,损失值不再继续下降,可调整learning_rate
model.compile(optimizer=tf.keras.optimizers.Adam(learning_rate=0.00001),loss='mse',metrics=["mae"])

history=model.fit(ds_train,epochs=40,validation_data=ds_test,initial_epoch=20)
保存模型
model.save("head_location.h5")
识别图片
对图片进行识别标准头像位置
def test_img(img_path):
    img=process_image(img_path)
#     print(img*255)
    img4=tf.expand_dims(img,0)
    xmin,ymin,xmax,ymax=model.predict(img4)
    print(xmin,ymin,xmax,ymax)

    img_arr=(img.numpy()*255).astype("uint8")
#     print(img.numpy())
    img_pil=Image.fromarray(img_arr)
    draw = ImageDraw.Draw(img_pil)
    draw.line([(xmin, ymin),(xmax,ymin),(xmax,ymax),(xmin,ymax),(xmin, ymin)],width=1,fill='red')
    display.display(img_pil)

# test_img('/kaggle/input/head-location/annotations/annotations/trimaps/shiba_inu_22.png')
test_img('/kaggle/input/head-location/images/images/miniature_pinscher_124.jpg')
test_img('/kaggle/input/head-location/images/images/Persian_14.jpg')
test_img('/kaggle/input/head-location/images/images/Bengal_196.jpg')