概述
通过继承WebSecurityConfigurerAdapter类实现
工程目录结构
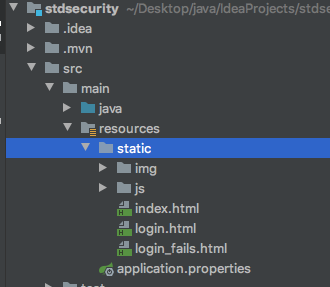
创建相应的页面
login.html关键部分:
<form method="post" action="/login">
    用户名:<input name="username"><br>
    密码:<input name="password"><br>
    <input type="submit">
</form>
注意表单action不能变,用户名、密码控件的name值不能变,否则下面配置就要做调整
实现配置类
//@Configuration //使用这个注解也可以,2个注解同时用也可以
@EnableWebSecurity
public class WebSecurityConfig extends WebSecurityConfigurerAdapter {

    @Override
    protected void configure(AuthenticationManagerBuilder auth) throws Exception {
//      将用户名、密码放入内存中
        auth.inMemoryAuthentication()
//                .passwordEncoder(NoOpPasswordEncoder.getInstance())//密码为明文
                .withUser("admin")//用户名
                .password("{noop}123456")//{noop}表示密码为明文,与上面是同一个含义
                .roles("ADMIN");//admin角色,角色一般全大写
                //.authorities("mng_user");//管理user权限,权限一般小写
    }

    @Override
    public void configure(WebSecurity web) throws Exception {
        web.ignoring().antMatchers("/css/**","/js/**","/img/**");//绕开所有的filter,直接跳过验证
    }

    //    安全拦截机制
    @Override
    public void configure(HttpSecurity http) throws Exception {
        http.csrf().disable()//禁用csrf
//                .csrfTokenRepository(CookieCsrfTokenRepository.withHttpOnlyFalse())
//                .and()

                .authorizeRequests()//url权限配置
//                .antMatchers("/index.html").permitAll() // 匹配这些路径可以所有人访问
                .antMatchers("/dept/**").hasRole("ADMIN")
                .antMatchers("/user/**").hasRole("ADMIN")
                .anyRequest().authenticated()
                .and()

                //login部分
                .formLogin()
                .loginPage("/login.html")//指定登录页面。所有url前面必须写/,否则报错 'xxx' is not a valid forward URL
                .loginProcessingUrl("/login")//security提供的处理登录url,默认是/login
//                .successForwardUrl("/index.html")//登录成功后跳转的页面,需要额外处理才能使用,否则页面会提示错误
                .defaultSuccessUrl("/index.html")//登录成功后重定向的页面
                .failureUrl("/login_fails.html")//登录失败跳转的页面
//                .failureForwardUrl("/login_fails.html")//登录失败不会转发
                .permitAll()//让login部分的url可以任意访问
//
//                //logout部分
                .and()
                .logout()
                .logoutSuccessUrl("/login.html")//退出成功访问的页面
                .invalidateHttpSession(true)//清空session
                .permitAll();//让logout部分的url可以任意访问

    }

}
注意: spring security默认密码是加密的,这里为了简单,密码前面加上{noop},表示不加密,是明文
http.permitAll 与 web.ignoring 的区别
这两个都是继承WebSecurityConfigurerAdapter后重写的方法
http.permitAll不会绕开springsecurity验证,相当于是允许该路径通过web.ignoring是直接绕开spring security的所有filter,直接跳过验证
url匹配
.authorizeRequests(),url权限配置,通过该方法可以调用.antMatchers(),anyRequest()、.authenticated(),.permitAll()、.hasRole("hr")等方法,匹配url,设置权限.antMatchers("/doLogin", "/css/**","/js/**","/img/**"):匹配路径,"/doLogin", "/css/**","/js/**","/img/**"*表示当前目录下所有资源,**表示当前目录及子目录的所有资源
.permitAll():无需保护.anyRequest():任意url.authenticated():需要认证,即:登录
密码使用明文的另一种方式
指定密码编码器为:NoOpPasswordEncoder.getInstance(),此时密码为:.password("123456")前面千万不要加:{noop}。
注意:如果密码设置成:.password("{noop}123456"),那么{noop}表示密码的一部分
//    指定密码编码器
    @Bean
    public PasswordEncoder passwordEncoder(){
//        return new BCryptPasswordEncoder();
        return NoOpPasswordEncoder.getInstance();
    }


    @Override
    protected void configure(AuthenticationManagerBuilder auth) throws Exception {
//      将用户名、密码放入内存中
        auth.inMemoryAuthentication()
//                .passwordEncoder(NoOpPasswordEncoder.getInstance())//密码为明文
                .withUser("admin")//用户名
                .password("123456")//此时不要加{noop}
                .roles("admin");//admin角色
    }
启动服务
由于配置了用户、密码,所以启动时不再随机生成密码,也就不打印密码了
测试
访问 http://localhost:8080/ ,会跳转到 指定的登录页面,不再是security默认的登录页
登录:
用户名:admin
密码:123456
点击登录,如果没问题的话,可以访问首页